Digital Wallet Tokens
Overview
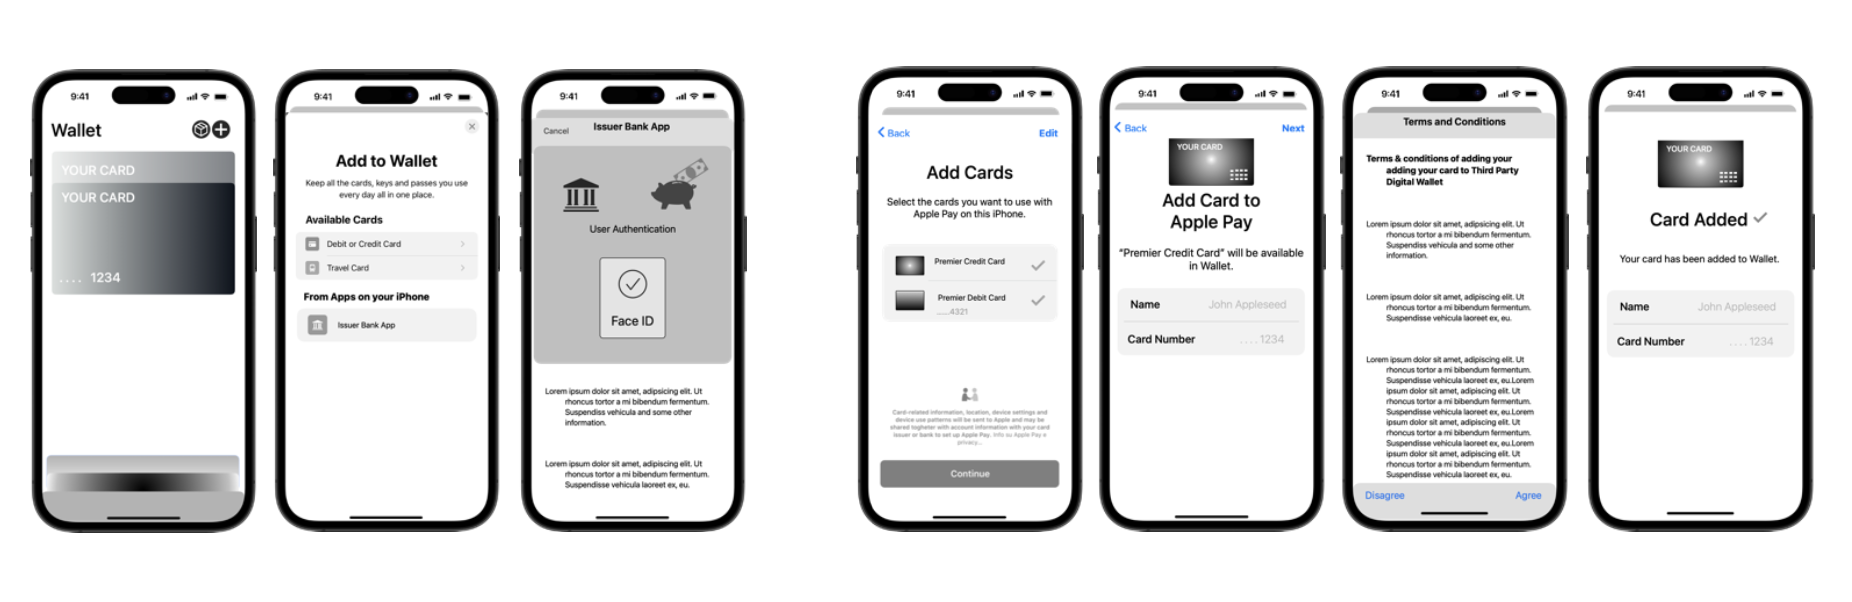
Digital Wallet Tokens allow you to tokenize accounts within a third-party digital wallet, such as Google Pay, Apple Pay and Samsung Pay. Your customers can pay anywhere the digital wallet is accepted, such as in stores using NFC Tap and Pay.
Open Fabric provides a standalone SDK to enable push provisioning into digital wallets, please refer to our Getting Started guide to learn how to set up the SDK within your project.
In this guide we'll explain:
- How to request push provisioning access with Apple, Google or Samsung
- How to display the Add to Wallet button
- How to provision an account token into the digital wallet
Request push provisioning access with the digital wallet (prerequisite)
Before you can start, you need to make sure that your app is registered with the digital wallet and approved to provision cards into their wallet.
Apple Pay
In order for you to enable in-app provisioning of your customers' virtual cards into their Apple Wallet, you need to obtain approval from Apple, which includes granting the required Apple Pay entitlements. You can apply through the dedicated Submission Form https://developer.apple.com/contact/request/apple-pay-in-app-provisioning/
Only Account Holders can access this form. If you are unable to access, you will need to coordinate with the Account Holder of your team in order to formally submit.
There may be a need for a commercial agreement/contract with Apple before they release the entitlements.
Google Pay
In order for you to enable in-app provisioning of your customers' virtual cards into their Google Pay Wallet, you need to obtain approval from Google by following this Get Started guide https://developers.google.com/pay/issuers/overview/get-started
Samsung Pay
In order for you to enable in-app provisioning of your customers' virtual cards into their Samsung Pay Wallet, you need to obtain approval from Samsung by following these steps:
- Sign Up for Samsung Pay Developers account: https://pay.samsung.com/developers/tour/memberguide
- Create Service for App to App card enrollment: https://pay.samsung.com/developers/tour/svcguide
- Download Samsung Pay SDK and register app: https://pay.samsung.com/developers/tour/appsguide
Displaying the "Add to Wallet" button
In order to push a virtual card into the respective wallet, you will need to present an "Add to Wallet" button as an option for your customers in your application.
Display this button only if the customer’s token is not yet pushed to the wallet. See Checking provisioned token status in wallet on how to verify this.
- Add to Apple Wallet
- Add to Google Pay
- Add to Samsung Pay
import PassKit

class PaymentCardProvisioningViewController: UIViewController {
  override func viewDidLoad() {
    super.viewDidLoad()

    // Check if the device supports adding payment passes
    if PKAddPaymentPassViewController.canAddPaymentPass() {
      // Create the "Add to Apple Wallet" button
      let addPassButton = PKAddPassButton()
      // Add handler for the button
      addPassButton.addTarget(
        self, action: #selector(addPaymentPassButtonTapped), for: .touchUpInside)

      // Add code to position the button

      // Add the button to the view
      view.addSubview(addPassButton)
    } else {
      print("This device doesn't support adding payment passes.")
    }
  }

  // other code
}
class PushProvisioningActivity: AppCompatActivity() {
  private lateinit var addToGooglePayButton: Button

  override fun onCreate(savedInstanceState: Bundle?) {
    super.onCreate(savedInstanceState)
    setContentView(R.layout.activity_push_provisioning)

    addToGooglePayButton = findViewById(R.id.button_add_to_gpay)

    addToGooglePayButton.setOnClickListener {
      pushProvisionPaymentCard()
    }
  }

  // other code
}
class PushProvisioningActivity: AppCompatActivity() {
  private lateinit var addToSamsungPayButton: Button

  override fun onCreate(savedInstanceState: Bundle?) {
    super.onCreate(savedInstanceState)
    setContentView(R.layout.activity_push_provisioning)

    addToSamsungPayButton = findViewById(R.id.button_add_to_spay)

    addToSamsungPayButton.setOnClickListener {
      pushProvisionPaymentCard()
    }

    // Check eligibility and show/hide "Add to Samsung Pay" button
    checkEligibilityAndUpdateUI()
  }

  private fun checkEligibilityAndUpdateUI() {
    val partnerInfo = PartnerInfoHolder.getInstance(this@PushProvisioningActivity).partnerInfo
    val samsungPay = SamsungPay(this@PushProvisioningActivity, partnerInfo)

    samsungPay.getSamsungPayStatus(object : StatusListener {
      override fun onSuccess(status: Int, bundle: Bundle?) {
        if (status == SpaySdk.SPAY_READY) {
          addToSamsungPayButton.visibility = View.VISIBLE
        } else {
          addToSamsungPayButton.visibility = View.GONE
        }
      }
    })
  }

  // other code
}
Provisioning account token into the wallet
When a customer clicks on "Add to Wallet" button, you will need to:
- Tokenize a customer's account
- Push the token into the wallet
Tokenizing a customer's account
To initiate a push provisioning for a given customer’s account, request a one-time push provisioning token (similar to an access token) for that account from your backend.
This provisioning token is passed to Open Fabric’s Push Provisioning SDK in the next step.
For security reasons, it is essential to make the API call from the backend.
Use the Provision API, with the following parameters:
typeset topush_provisioninstrumentset toapple_pay,google_payorsamsung_pay
The API will respond with a provision_token which then needs to be handed back to the SDK for the next step.
The tenant_customer_ref and tenant_account_ref are required fields and need to be filled with a reference to your customer and their account.
Use the tenant_account_ref if you want to distinguish different funding sources. But if customers do not have multiple accounts in your system, you may also choose to copy the value of tenant_customer_ref in this field.
If you expect yellow-path provisioning, include masked_phone_number and/or masked_email in billing_address. These are shown to the customer as the available channels for receiving the activation code. See Verify with activation code (OTP) for details.
Sample request
Headers:
  Idempotency-Key: 40709949-0712-487c-a2fe-1dd2e64af506
- Apple Pay
- Google Pay
- Samsung Pay
{
  "type": "push_provision",
  "instrument": "apple_pay",
  "tenant_customer_ref": "customer-00000000000001",
  "tenant_account_ref": "FR00000000000001",
  "tenant_token_ref": "TOK000000000000001",
  "billing_currency": "PHP",
  "billing_address": {
    "address_line_1": "8751 Paseo de Roxas St.",
    "address_line_2": "",
    "city": "Makati City",
    "state": "Metro Manila",
    "post_code": "1226",
    "country_code": "PH",
    "masked_phone_number": "*****123",
    "masked_email": "abc***@***.com"
  }
}
{
  "type": "push_provision",
  "instrument": "google_pay",
  "tenant_customer_ref": "customer-00000000000001",
  "tenant_account_ref": "FR00000000000001",
  "tenant_token_ref": "TOK000000000000001",
  "billing_currency": "PHP",
  "billing_address": {
    "address_line_1": "8751 Paseo de Roxas St.",
    "address_line_2": "",
    "city": "Makati City",
    "state": "Metro Manila",
    "post_code": "1226",
    "country_code": "PH"
  }
}
{
  "type": "push_provision",
  "instrument": "samsung_pay",
  "tenant_customer_ref": "customer-00000000000001",
  "tenant_account_ref": "FR00000000000001",
  "tenant_token_ref": "TOK000000000000001",
  "billing_currency": "PHP",
  "billing_address": {
    "address_line_1": "8751 Paseo de Roxas St.",
    "address_line_2": "",
    "city": "Makati City",
    "state": "Metro Manila",
    "post_code": "1226",
    "country_code": "PH"
  }
}
Sample response
- Apple Pay
- Google Pay
- Samsung Pay
{
    "tenant_account_ref": "FR00000000000001",
    "tenant_customer_ref": "customer-00000000000001",
    "customer_id": "40095c2f-d391-4e06-94d9-cf0b3191c548",
    "account_id": "5bafb9bc-9573-4acf-b686-04bf62c81af8",
    "digital_token_id": "8a194ecb-6d8d-4266-8b66-c83ef3a146e0",
    "provision_token": "eyJraWQiOiIySGhTQUNV...",
    "status": "active",
    "locked": false,
    "instrument": "apple_pay",
    "created_at": "2026-03-17T03:45:40.745Z",
    "updated_at": "2026-03-17T03:45:40.745Z"
}
{
    "tenant_account_ref": "FR00000000000001",
    "tenant_customer_ref": "customer-00000000000001",
    "customer_id": "40095c2f-d391-4e06-94d9-cf0b3191c548",
    "account_id": "5bafb9bc-9573-4acf-b686-04bf62c81af8",
    "digital_token_id": "8a194ecb-6d8d-4266-8b66-c83ef3a146e0",
    "provision_token": "eyJraWQiOiIySGhTQUNV...",
    "status": "active",
    "locked": false,
    "instrument": "google_pay",
    "created_at": "2026-03-17T03:45:40.745Z",
    "updated_at": "2026-03-17T03:45:40.745Z"
}
{
    "tenant_account_ref": "FR00000000000001",
    "tenant_customer_ref": "customer-00000000000001",
    "customer_id": "40095c2f-d391-4e06-94d9-cf0b3191c548",
    "account_id": "5bafb9bc-9573-4acf-b686-04bf62c81af8",
    "digital_token_id": "8a194ecb-6d8d-4266-8b66-c83ef3a146e0",
    "provision_token": "eyJraWQiOiIySGhTQUNV...",
    "status": "active",
    "locked": false,
    "instrument": "samsung_pay",
    "created_at": "2026-03-17T03:45:40.745Z",
    "updated_at": "2026-03-17T03:45:40.745Z"
}
Push the provisioned token into the wallet
After acquiring the provision_token, it can be pushed into the wallet, along with additional provisioning configuration such as cardholder/customer name, card display name, etc.
- Apple Pay
- Google Pay
- Samsung Pay
class PaymentCardProvisioningViewController: UIViewController {
  // other code

  @objc func addPaymentPassButtonTapped() {
    // Call backend to request push provisioning token from OF
    let provisionToken = "..."

    // Initialize OFPushProvisioningSDK
    let ofPushProvisionSdk = OFPushProvisionSDK()

    // Configure provisioning parameters
    let provisionConfig = ProvisionConfiguration()
    provisionConfig.provisionToken = provisionToken
    provisionConfig.cardHolderName = "..."
    provisionConfig.cardDisplayName = "..."

    // Start provisioning
    ofPushProvisionSdk.startProvisioning(
      viewController: self,
      configuration: provisionConfig,
      completion: {
        completionResult in
        switch completionResult {
        case .success(let result):
          print("Token is successfully added into the wallet.")
          print("Tenant account ref: \(result.tenantAccountRef)")
          print("Issuer token id: \(result.issuerTokenId)")
        case .failure(let err):
          print(err.localizedDescription)
        }
      }
    )
  }
}
class PushProvisioningActivity: AppCompatActivity() {
  private lateinit var ofPushProvisionSdk: OfPushProvisionSdk;
  // other code

  // Handle onActivityResult with OfPushProvisionSdk.PUSH_PROVISIONING_REQUEST_CODE
  override fun onActivityResult(requestCode: Int,resultCode: Int,  data: Intent?) {
    super.onActivityResult(requestCode, resultCode, data)

    // Handle the push provisioning callback from Google Pay
    val status = sdk.onActivityResult(this, requestCode, resultCode, data);
    if (status === PushProvisionActivityResultStatus.TOKENIZE_SUCCESS) {
        issuerTokenId = data?.getStringExtra(TapAndPay.EXTRA_ISSUER_TOKEN_ID)
    } else if (status === PushProvisionActivityResultStatus.DELETE_TOKEN_SUCCESS) {
        Log.i("TapAndPay", "Account has been removed from Google Wallet.")
    } else if(status === PushProvisionActivityResultStatus.TOKENIZE_FAIL || status === PushProvisionActivityResultStatus.DELETE_TOKEN_FAIL) {
        val errorMessage = data?.getStringExtra(OfPushProvisionSdk.EXTRA_ERROR_MESSAGE) ?: "Unknown error"
        Toast.makeText(this, "Google Wallet Error: $errorMessage", Toast.LENGTH_SHORT).show()
    }
  }

  private fun pushProvisionPaymentCard() {
    // Call backend to request wallet provisioning token from OF
    val provisionToken = "..."

    // Initialize OfWalletProvisioningSDK
    ofPushProvisionSdk = OfPushProvisionSdk.getInstance(
      environment = OfEnvironment.Prod
    )

    // Configure provisioning parameters
    val provisionConfig = ProvisionConfiguration(
      provisionToken = provisionToken,
      cardHolderName = "...",
      cardDisplayName = "..."
    )

    // Start provisioning
    ofPushProvisionSdk.startProvisioning(
      activity = this@PushProvisioningActivity,
      configuration = provisionConfig,
      callback = object: ProvisioningCallback {
        override fun onSuccess(message: String) {
          Log.i("TapAndPay", "Start provisioning account into Google Wallet.")
        }

        override fun onFailure(e: Exception) {
          Log.e("TapAndPay", "Error provisioning", e)
        }
    })
  }
}
class PushProvisioningActivity: AppCompatActivity() {
  // other code
  private fun pushProvisionPaymentCard() {
    // Call backend to request wallet provisioning token from OF
    val provisionToken = "..."

    // Initialize OfWalletProvisioningSDK
    val ofPushProvisionSdk = OfPushProvisionSdk.getInstance(
      digitalWallet: DigitalWallet.SAMSUNG_PAY,
      environment = OfEnvironment.Prod
    )

    // Configure provisioning parameters
    val provisionConfig = ProvisionConfiguration(
      provisionToken = provisionToken
    )

    // Start provisioning
    ofPushProvisionSdk.startProvisioning(
      activity = this@PushProvisioningActivity,
      configuration = provisioningConfig,
      callback = object: ProvisioningCallback {
        override fun onSuccess(message: String) {
          Log.i("SamsungPay", "Static Token is successfully added into the wallet.")
        }

        override fun onFailure(e: Exception) {
          Log.e("SamsungPay", "Error provisioning", e)
        }
    })
  }
}
At this point, the digital wallet presents its confirmation flow and the customer completes adding the token.
Checking provisioned token status in the Digital Wallet
After a customer’s provisioned token is pushed into the digital wallet, its status can be queried at any time. This status can be used to conditionally display the "Add to Wallet" button or for any necessary user experience design.
- Apple Pay
- Google Pay
- Samsung Pay
// checkTokenStatus returns a CardWalletStatus describing the token's state.
// You can look the token up by either tenantAccountRef or issuerTokenId:
let status = ofPushProvisionSdk.checkTokenStatus(tenantAccountRef: tenantAccountRef)
// or, by the device token reference:
// let status = ofPushProvisionSdk.checkTokenStatus(issuerTokenId: issuerTokenId)

switch status {
case .notAdded:
  // Token is not in the wallet
  // Show "Add to Apple Wallet" button
case .activated, .requiresActivation, .activating, .suspended, .deactivated:
  // Token is already in the wallet (in one of its provisioned states)
case .unavailable:
  // Apple Wallet can't hold passes here (e.g. Simulator, missing entitlement)
case .unknown:
  break
@unknown default:
  break
}
checkTokenStatus accepts either tenantAccountRef (the card's
primaryAccountIdentifier) or issuerTokenId (the pass's
deviceAccountIdentifier) — use whichever you have. To check a
paired device (such as an Apple Watch) instead of this device, use the matching
checkRemoteTokenStatus(tenantAccountRef:) / checkRemoteTokenStatus(issuerTokenId:).
ofPushProvisionSdk.checkTokenStatus(
  activity = this@PushProvisioningActivity,
  last4DigitsOrIssuerTokenId = issuerTokenId, // or last 4 digits of the account number
  cardNetwork = CardNetwork.MASTERCARD,
  callback = object: CheckTokenStatusCallback {
    override fun onSuccess(tokenized: Boolean) {
      if (tokenized) {
        Log.i("TapAndPay", "Account Token is already added into the wallet.")
      } else {
        // Account Token is not in the wallet.
        // Show "Add to Google Pay" button
      }
    }

    override fun onFailure(e: Exception) {
      Log.e("TapAndPay", "Error provisioning", e)
    }
  }
)
ofPushProvisionSdk.checkTokenStatus(
  activity = this@PushProvisioningActivity,
  issuerTokenId = issuerTokenId,
  callback = object: CheckTokenStatusCallback {
    override fun onSuccess(tokenized: Boolean) {
      if (tokenized) {
        Log.i("TapAndPay", "Static Token is already added into the wallet.")
      } else {
        // Static Token is not in the wallet.
        // Show "Add to Samsung Pay" button
      }
    }

    override fun onFailure(e: Exception) {
      Log.e("TapAndPay", "Error provisioning", e)
    }
  }
)
Removing a token from the digital wallet
After a customer’s account is pushed to a digital wallet, you can request that the digital wallet removes the token using the issuerTokenId.
- Google Pay
ofPushProvisionSdk.requestDeleteToken(
  activity = this@PushProvisioningActivity,
  issuerTokenId = issuerTokenId,
  cardNetwork = CardNetwork.MASTERCARD,
  callback = object: = object: ProvisioningCallback {
        override fun onSuccess(message: String) {
          Log.i("TapAndPay", "Start requesting deleting account token from Google Wallet.")
        }

        override fun onFailure(e: Exception) {
          Log.e("TapAndPay", "Error requesting delete token", e)
        }
    }
)
The delete request will be processed by the wallet and the result will be sent back to your app via the onActivityResult() method.
Yellow-path provisioning (Verification required)
When a customer adds a card to a digital wallet, the wallet and the payment network operator (PNO) perform a risk assessment of the provisioning request. This applies to all supported wallets – Apple Pay, Google Pay and Samsung Pay. The outcome of this assessment determines the provisioning path:
- Green path – low risk. The token is activated immediately, with no extra verification required. This is the default behaviour for the in-app push provisioning flow described earlier in this guide.
- Yellow path – additional risk. The customer must verify their identity before the token can be activated for payments.
- Red path – the request is declined.
On the yellow path, the wallet provisions the token in a temporary, non-active state and asks the customer to complete a verification step. The set of verification options offered to the customer (the activation methods) is returned to the wallet during provisioning, and the customer picks one of them to finish activation.
Until verification is completed, the token cannot be used for payments. The customer can also choose to verify later from within the digital wallet.
Open Fabric supports the following activation methods for the yellow path.
Verify with in-app verification (Apple Wallet only)
With in-app verification, the customer completes the verification step inside your own application rather than via a code sent over a separate channel. This is the most seamless option and is recommended when the customer is already authenticated in your app at the time of provisioning.
In-app verification is only offered when the customer is provisioning on the same device that has your app installed. If the customer is adding the card from another device (for example, a paired smartwatch or a companion device), this method will not be available and the customer must use one of the other activation methods.
For Apple Pay, when a token requires verification, Apple Wallet opens your app via the appLaunchURL registered for the card, appending passTypeIdentifier, action=verify and serialNumber (which identifies the pass). Your app then:
- Verifies the cardholder with your own identity check (app login, OTP, biometrics, KYC) — this is cardholder verification, not device authentication.
- Reads the pending pass's identifiers from the SDK and requests activation data from your backend, which calls Open Fabric's Activate Digital Token API with
activation_modeset totav. - Hands the activation data (Base64 TAV bytes) back to the SDK to activate the token.
- Apple Pay
// In your SceneDelegate, handle Wallet's appLaunchURL deep link
func scene(_ scene: UIScene, openURLContexts URLContexts: Set<UIOpenURLContext>) {
  guard let url = URLContexts.first?.url,
        let serialNumber = serialNumber(from: url) else { return }

  // 1. Verify the cardholder (your identity check)

  // 2. Read the pending pass's identifiers, then send them to your backend
  guard let details = ofPushProvisionSdk.activationDetails(serialNumber: serialNumber) else { return }
  // POST details.tenantAccountRef + details.issuerTokenId to your backend → activation_data

  // 3. Activate the token with the activation data from your backend
  ofPushProvisionSdk.activateCard(serialNumber: serialNumber, activationData: activationData) {
    result in
    switch result {
    case .success:
      print("Token activated.")
    case .failure(let err):
      print(err.localizedDescription)
    }
  }
}
The scheme in your appLaunchURL must match a CFBundleURLSchemes entry in your app's Info.plist, or the deep link won't reach your app.
Sample request (Activate Digital Token API)
{
  "tenant_account_ref": "FR00000000000001",
  "tsp_token_ref": "DAPLMC00000000000000000000000001",
  "activation_mode": "tav"
}
Sample response
{
  "success": true,
  "activation_mode": "tav",
  "activation_data": "MTIzNDU2Nzg5MGFiY2RlZmdoaWprbA=="
}
The activation_data (Base64-encoded TAV bytes) is returned only for the tav activation mode. Pass it back to the SDK to activate the token.
In-app verification gives the smoothest customer experience because no code needs to be entered manually. Offer it whenever you can re-authenticate the customer in your app.
Verify with activation code (OTP)
With activation-code verification, a one-time password (OTP) is sent to a channel that already belongs to the customer, such as their registered mobile number (SMS) or email address. The customer enters the code to prove ownership of that channel before the token is activated.
The flow is:
- The wallet presents the customer with the available channels (for example, the masked phone number and email address you supplied in the Provision API
billing_address). - The customer selects a channel. The PNO generates the one-time password and sends it to Open Fabric. Open Fabric forwards it to your backend via the 3DS Send OTP request API, so that you can deliver the code to the customer over the selected channel.
- The customer enters the code in the wallet. The PNO validates it and activates the token.
The masked contact details shown to the customer come from the masked_phone_number and masked_email fields in the billing_address of your provision request. Make sure these match the channels you can actually deliver the OTP to.
Open Fabric forwards the OTP to your backend via the 3DS Send OTP request webhook. The authentication_credential holds the OTP to deliver to the customer. Your backend responds with the masked contact details that the wallet displays on the challenge screen.
Sample request (sent by Open Fabric to your webhook)
{
  "three_ds_challenge_id": "3ds-00000000-0000-0000-0000-000000000001",
  "tenant_customer_ref": "customer-00000000000001",
  "customer_id": "40095c2f-d391-4e06-94d9-cf0b3191c548",
  "tenant_account_ref": "FR00000000000001",
  "account_id": "5bafb9bc-9573-4acf-b686-04bf62c81af8",
  "digital_token_id": "8a194ecb-6d8d-4266-8b66-c83ef3a146e0",
  "merchant_name": "Apple Pay",
  "creation_time": "2026-03-17T03:45:40.745Z",
  "authentication_credential": "123456",
  "delivery_channels": ["sms"],
  "device_info": {
    "device_name": "My Phone",
    "device_type": "mobile_phone",
    "os_name": "IOS",
    "os_version": "15.0.1.",
    "device_fingerprint": "N/A",
    "serial_number": "2F6D63",
    "imei": "N/A",
    "msisdn": "N/A",
    "nfc_capable": true
  }
}
Sample response (returned by your webhook)
{
  "three_ds_challenge_id": "3ds-00000000-0000-0000-0000-000000000001",
  "masked_phone_number": "*****123",
  "masked_email": "abc***@***.com"
}
Verify by contacting customer support
When the customer cannot complete in-app verification or receive an activation code, they can verify by contacting your customer support. The wallet displays the support phone number (and/or other contact details) that you configured for this method.
The customer calls your support line, and your agent verifies the customer's identity through your usual procedures. Once verified, your backend activates the token by calling the Activate Digital Token API with activation_mode set to customer_service. Open Fabric activates the token server-side with the PNO, and the token becomes active for payments.
Sample request (Activate Digital Token API)
{
  "tenant_account_ref": "FR00000000000001",
  "tsp_token_ref": "DAPLMC00000000000000000000000001",
  "activation_mode": "customer_service",
  "reason_code": "01"
}
Sample response
{
  "success": true,
  "activation_mode": "customer_service"
}
For the customer_service activation mode, the token is activated server-side with the PNO, so no activation_data is returned.
Treat the call-center method as a fallback. It is the least convenient option for the customer, so present it alongside in-app verification and OTP rather than as the primary choice.
Wallet Extensions (Apple Wallet only)
Apple Wallet can let customers add your card directly from within the Wallet app (Wallet → +), without opening your app. This complements the in-app "Add to Apple Wallet" flow described above and is a requirement for some Apple Pay programs.
A Wallet Extension is an iOS app extension that ships inside your app. It comes as two separate extension targets. Each target declares which kind of extension it is through the NSExtensionPointIdentifier key in its Info.plist:
| Extension | NSExtensionPointIdentifier (in the target's Info.plist) | Provided by |
|---|---|---|
| Non-UI provisioning | com.apple.PassKit.issuer-provisioning | Open Fabric SDK — subclass OFPushProvisioningExtensionHandler |
| Authorization (UI) | com.apple.PassKit.issuer-provisioning.authorization | You — your authentication UI |
The non-UI provisioning extension runs in the background to tell Apple Wallet which cards are available and to fetch provision tokens, while the authorization (UI) extension presents your sign-in screen when the customer needs to authenticate.
How it works
- From the Wallet app, the customer taps the add (+) button and chooses one of your cards under "Cards from apps on your iPhone".
- Apple Wallet asks your non-UI extension whether any cards are available and whether authentication is needed. The extension must respond within Apple's time limit (around 100 ms), so it should read cached state rather than make network calls.
- If authentication is required, Apple Wallet launches your authorization (UI) extension so the customer can sign in, using the same credentials as your main app.
- Apple Wallet shows the list of eligible cards returned by your non-UI extension's
currentConfiguration(). - When the customer selects a card, the Open Fabric SDK calls your
fetchProvisionTokento obtain aprovision_tokenfrom your backend, then completes provisioning with PassKit. - The card is provisioned into Apple Wallet, following the same green-path / yellow-path rules described in Yellow-path provisioning.
Implementing the extensions
The non-UI extension lists the customer's provisionable cards and fetches the provision token. Because the SDK has no credentials to call the Open Fabric API directly, fetchProvisionToken must delegate to your backend, which must call the Provision API and returns the token (the same call as in the regular in-app provisioning flow). The Open Fabric SDK provides the base class:
class ProvisioningExtensionHandler: OFPushProvisioningExtensionHandler {
  // other code

  // Tell Wallet which cards can be provisioned
  override func currentConfiguration() -> OFExtensionConfiguration {
    let card = OFCardData(
      tenantAccountRef: "...",
      cardHolderName: "...",
      cardDisplayName: "...",
      last4: "...",
      network: "...",
      cardArt: { UIImage(named: "CardArt")?.cgImage }
    )
    return OFExtensionConfiguration(requiresAuthentication: true, cards: [card])
  }

  override func fetchProvisionToken(forIdentifier identifier: String) async throws -> String {
    // Call your backend to request a provision_token from OF (Provision API)
    let provisionToken = "..."
    return provisionToken
  }
}
The authorization (UI) extension is a separate target that presents your authentication when verification is required; the SDK does not provide it — it's specific to your app. Apple provides the PKIssuerProvisioningExtensionAuthorizationProviding protocol; your view controller adopts it, presents your sign-in UI, and calls the completionHandler that Apple Wallet sets with the result.
import PassKit
import UIKit

class AuthorizationProvidingViewController: UIViewController, PKIssuerProvisioningExtensionAuthorizationProviding {
  // Apple Wallet sets this; call it once the customer has authenticated (or cancelled)
  var completionHandler: ((PKIssuerProvisioningExtensionAuthorizationResult) -> Void)?

  override func viewDidLoad() {
    super.viewDidLoad()
    // Present your sign-in UI, using the same credentials as your main app
  }

  private func authenticateWithFaceID() {
    // Run your Face ID / biometric check, then signal the result
    if authenticated {
      // Customer authenticated — let Apple Wallet continue provisioning
      completionHandler?(.authorized)
    } else {
      // Authentication failed or the customer cancelled
      completionHandler?(.canceled)
    }
  }
}
Wallet Extensions build on in-app provisioning, so you must have completed the in-app provisioning integration first. The customer must also have opened your app and signed in at least once, so that Apple Wallet can detect your extension and the available cards.
Both extensions require the com.apple.developer.payment-pass-provisioning entitlement and a shared App Group (so the extension can read card data written by your app), on top of the standard in-app provisioning entitlements. Your extension App IDs also need to be registered with the PNO — coordinate these with Apple as part of your onboarding.