PG token handover (reference integration guide)
This guide is for merchants that are not PCI compliant and want Open Fabric to tokenize the one-time virtual card with their payment gateway.
With the PG token handover pattern, Open Fabric creates a one-time virtual card for an approved transaction, submits it to your payment gateway, and returns a PG token. Your frontend/backend can then charge that PG token using your existing gateway integration. Refunds follow your existing gateway refund flow.
If you are PCI compliant and can fetch/process card details server-side, use the card handover guide instead.
If you prefer a direct API integration (no Web SDK), see PG token handover (API-only).
Supported payment gateways
OpenFabric directly connects with the following Payment Gateways to create a PG Token. We can only support PG Token Handover with Partners using any of these Payment Gateways only for card processing.
- Stripe
name: stripe - Xendit
name: xendit - PayMaya
name: paymaya - PayMongo
name: paymongo - Checkout.com
name: checkout - Omise
name: omise - Adyen
name: adyen
We will expand the above list as we connect directly with more Payment Gateways.
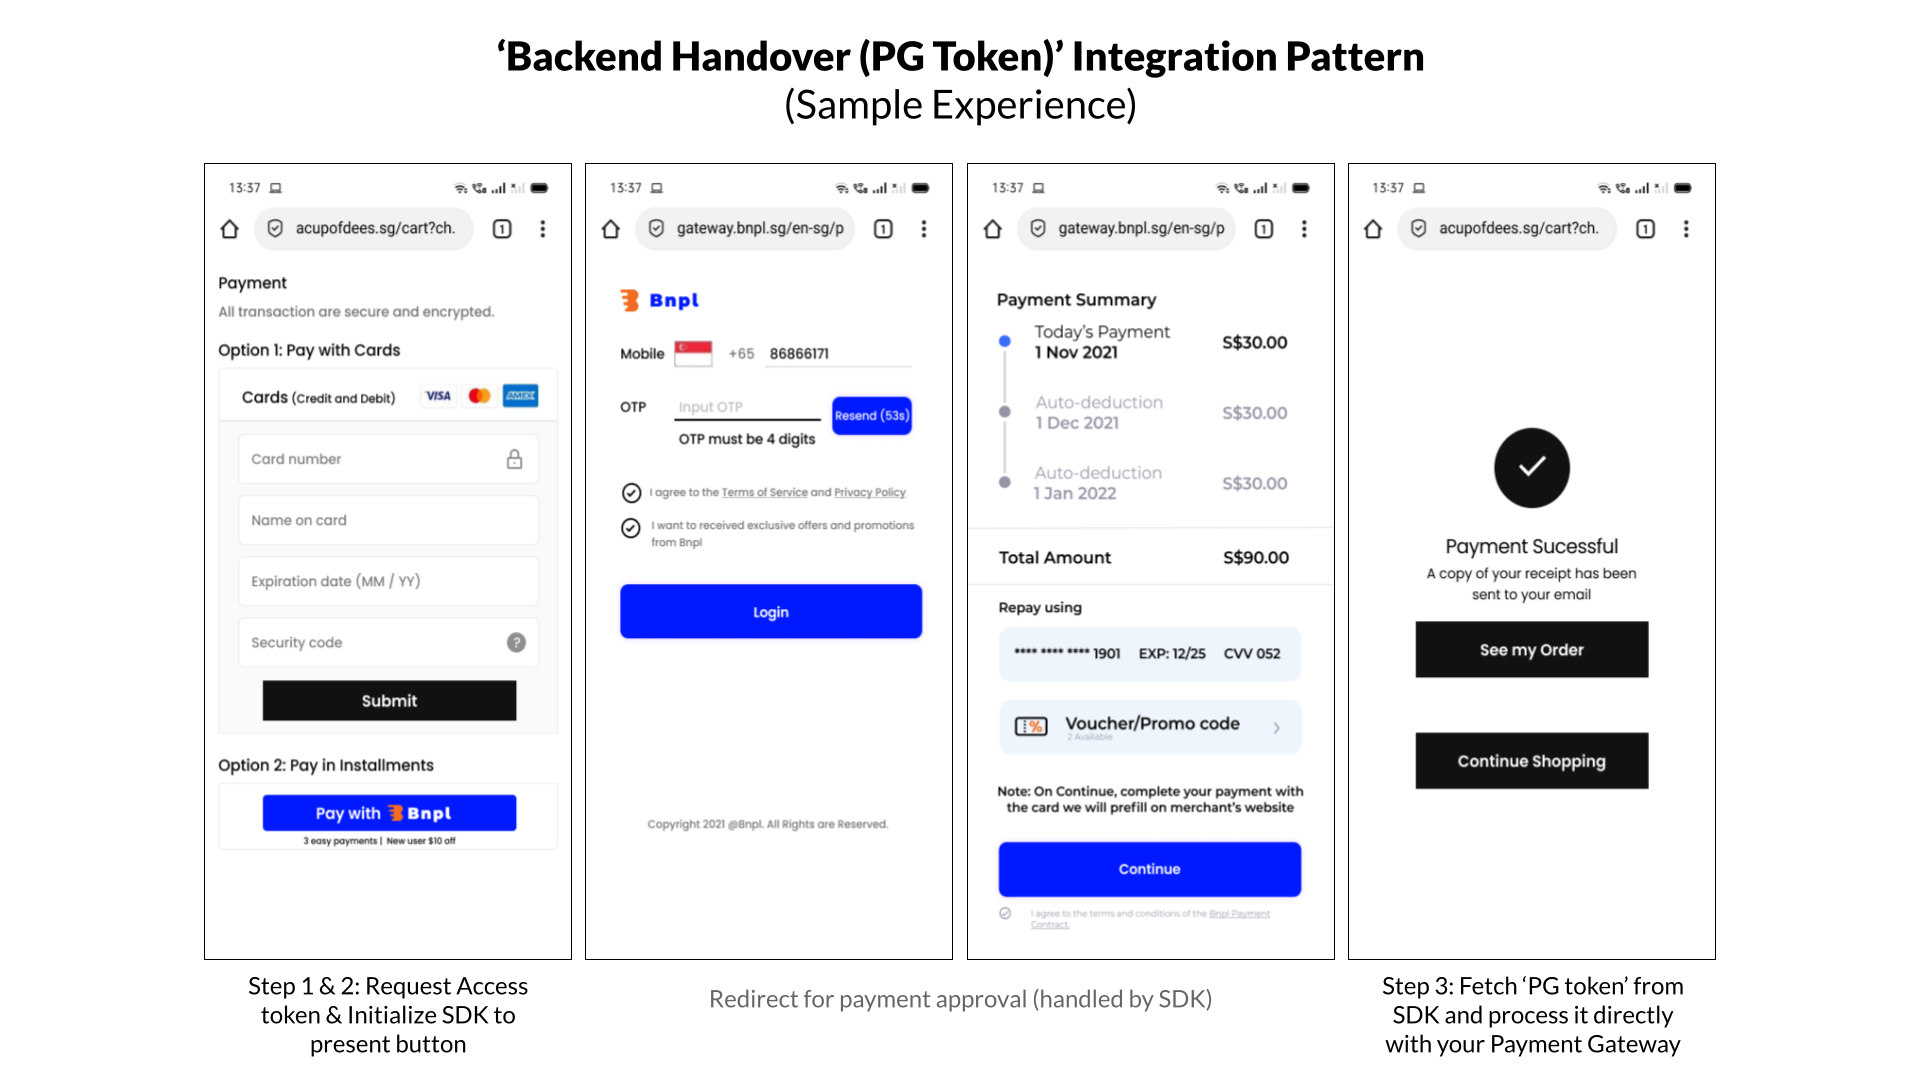
Customer experience (example)
Flow and system interactions
7. Integration Steps - Overview
| Step | Description |
|---|---|
| Step 1: Request access token | Your backend generates an access token using your Open Fabric credentials (client ID/secret). |
| Step 2: Initialize Merchant SDK (PG token) | Your checkout page includes and initializes the Open Fabric Merchant SDK. |
| Step 3: Charge the PG token | After approval, Open Fabric returns a txn_pg_token which you charge using your payment gateway. |
Once the token is charged successfully, you can show the payment result to the customer.
8. Integration Steps - Deep Dive
Step 1: Request Access token (Server-side)
Your backend generates an access token using your Open Fabric credentials (client ID and client secret). The access token is needed to initialize the Merchant SDK.
Note: Your client ID/secret are provided during onboarding. Sandbox and production use different credentials.
- NodeJS
- Java
- Curl
#
# Authorization header is base64 encoded value
# of your Client_ID and Client_Secret

var request = require('request');
var options = {
  'method': 'POST',
  'url': 'https://auth.openfabric.co/oauth2/token',
  'headers': {
    'Authorization': 'Basic MTdjMDFrN3VlaDZsYzJq',
    'Content-Type': 'application/x-www-form-urlencoded',
  },
  form: {
    'grant_type': 'client_credentials',
    'scope': 'txn.r txn.c'
  }
};
request(options, function (error, response) {
  if (error) throw new Error(error);
  console.log(response.body);
});
#
# Authorization header is base64 encoded value
# of your Client_ID and Client_Secret
#
OkHttpClient client = new OkHttpClient().newBuilder()
  .build();
MediaType mediaType = MediaType.parse("application/x-www-form-urlencoded");
RequestBody body = RequestBody.create(mediaType, "grant_type=client_credentials&scope=txn.r txn.c");
Request request = new Request.Builder()
  .url("https://auth.openfabric.co/oauth2/token")
  .method("POST", body)
  .addHeader("Authorization", "Basic MTdjMDFrN3VlaDZsYzJq")
  .addHeader("Content-Type", "application/x-www-form-urlencoded")
  .build();
Response response = client.newCall(request).execute();
#
# Authorization header is base64 encoded value
# of your Client_ID and Client_Secret
#
curl --location --request POST 'https://auth.openfabric.co/oauth2/token' \
--header 'Authorization: Basic MTdjMDFrN3VlaDZsYzJq' \
--header 'Content-Type: application/x-www-form-urlencoded' \
--data-urlencode 'grant_type=client_credentials' \
--data-urlencode 'scope=txn.r txn.c'
Note: The URL would be https://auth.openfabric.co/oauth2/token for production.
The response would be in the below format.
{"access_token": ACCESS_TOKEN }
Step 2: Initialize OpenFabric SDK for PG Token Handover (Client-side)
Initialize the Open Fabric Merchant SDK on your checkout page. You will need:
- Access token generated in Step 1
- Order details
- Payment Gateway details (name of the PG, Sharable Public Key).
2.1 Add dependency
Include the Open Fabric Merchant SDK JavaScript bundle.
<script type="module" src="https://unpkg.com/@openfabric/merchant-sdk@1.0.0/dist/index.umd.min.js">
</script>
Step 2.2 Add a payment method button
Add a button (or clickable element) that starts the Open Fabric flow, and wire its click handler.
<div id="payment-method-button">Pay with this payment method</div>
const paymentMethodButton = document.getElementById("payment-method-button");

openFabric.initialize().then(() => {
    paymentMethodButton.disabled = false;
});

paymentMethodButton.onclick = function () {
    if (paymentMethodButton.disabled) {
        return;
    }
    paymentMethodButton.onclick = null; // avoid double-click
    openFabric.startFlow();
};
2.3 Initialize OpenFabric SDK for PG Token Handover
Initialize the SDK with your redirect URLs, order details, and the payment-gateway name you want Open Fabric to use for tokenization.
Initializing OpenFabric SDK for PG Token Handover will require
- an access token (generated in step 1),
- order details - customer billing/shipping info, etc. (
- Callback URLs - success and failure URLs, etc.,
- information about their Payment Gateway
Sample of initializing SDK is below.
// Import Config and FillConfig from our SDK
import { OpenFabric } from "@openfabric/merchant-sdk"

const openFabric = OpenFabric(
    access_token,
    "https://acme-merchant.com/payment-success",// Success redirect url
    "https://acme-merchant.com/payment-failed" // Failure redirect url
)
    .setEnvironment(Environment.production) // use Environment.sandbox to run test transactions.

const customer_info = {
    mobile_number: "+632 8855 8800",
    first_name: "John",
    email: "john.doe@gmail.com",
};
const item = {
    item_id: "P100-1222",
    name: "iPhone",
    variation_name: "Black, 128GB",
    description: "string",
    quantity: 1,
    amount: 1,
    price: 2100.50,
    original_price: 2300,
    categories: ["phone"],
};

const address_line_1 = "30th Street corner 11th Avenue Bonifacio Global City, Lane P, Taguig, 1634 Metro Manila";
const post_code = "1634";

const shipping_address = {
    country_code: "ph",
    address_line_1,
    post_code,
};

const billing_address = {
    country_code: "ph",
    address_line_1,
    post_code,
};

const partner_reference_id = "142134235" // Merchant’s transaction reference ID/Order ID.

openFabric.createOrder({
        customer_info,
        amount: 2100.50,
        currency: "PHP",
        partner_reference_id,
        transaction_details: {
            shipping_address,
            billing_address,
            items: [item], // When there are multiple items, the total of all item.price should add up to the amount above.
        },
        pg_name: `${PAYMENT_GATEWAY_NAME}` // use one of the supported ‘PG Name’ from section 7 in this guide
});
OpenFabric SDK will redirect to the Payment Method's payment approval flow when a customer clicks on the payment button.
Step 3: Fetch and Process PG Token with PG
When the payment method approves a transaction, Open Fabric connects to your payment gateway, submits the one-time virtual card, and generates a token (a PG token) for that card.
The PG token is passed back as part of the redirect query string txn_pg_token. You can extract it from the URL like this:
const queryParams = new URLSearchParams(window.location.search);
const txn_pg_token = queryParams.get("txn_pg_token");
Charge the PG token using your existing payment gateway integration.
Note: If the customer declines (or the payment method rejects) a transaction, Open Fabric redirects to the failure URL configured during SDK initialization. You should present other ways to pay.
To issue refunds, initiate a refund through your payment gateway (same as any other card refund).
9. Test and Go Live
- Your client ID/secret are provided via the Open Fabric portal (sandbox and production are different).
- Use sandbox credentials to test against sandbox, and production credentials to run against production.